Sprint Blog 6
This sprint I was tasked with a lot of level editing and putting in newer assets and models throughout my levels.
Level 1B removed Sections Old Level 1B
One of my first tasks involved editing level 1B and removing certain sections to shorten the level. After some playtests, we learned that the level was still a little bit too long and some players were getting lost within the level. What I did to fix players getting lost was to remove 3 sections of the level that were not really necessary and just made moving around the level a lot more confusing.
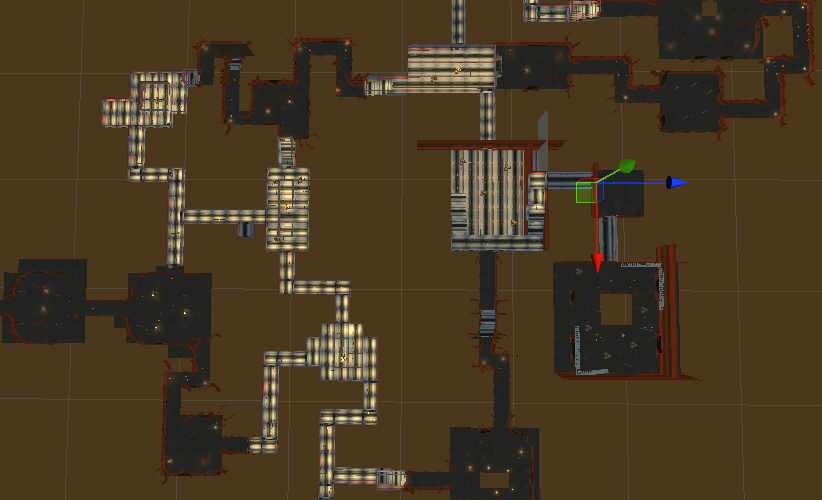
Level 3B Modular pieces
My big task for this sprint was to rebuild level 3B with the new textured, modular assets. During this process I also edited some hallways and rooms to condense the level a little bit so the playthrough is not as long. This process too a very long time and gave some headaces since I had to make sure each individual piece was lined up correctly and did not have any offset pieces or seams.
I ran into a few problems merging from github where I would lose some of my progress in building the level and I would have to go back and redo work but over time I was able to get everything placed correctly in the level.
Boss Room and Shop
Towards the end of putting everything together in 3B I put together the boss room and the shop for this level with the new modular assets so that they follow the overall theme of this laboratory level.
3B Assets


I had gotten the entirety of level 3B built with the modular assests. I went in a started placing enemies and spawners throughout the level for the player to engage in for the playtest. I also, placed health pickups and shield pickups throughout the level so that the player can obtain those items throughout gameplay. For more detail in the level I placed a bunch of unbreakable boxes in the level and I placed a bunch of lootboxs for players to destroy and hopefully get items.
3B Lighting
The last of my tasks was to put themeatic lighting throughout level 3B. I switched up the light color for this level to follow the tealish emission of the wall textures and it looks pretty nice within the level. For some of the bigger rooms and boss room, I used a red light to give a more of a dangerous look along with a bunch of enemies in those areas.
I wanted to get more done in this sprint but was set back a little bit due to waiting on the modular assets to build level 3B but once I got those I was able to knock out the level as fast as possible. There are a few things left to put into the level but overall it looks and plays really nice right now.
Sprint Blog 5
In Sprint 5 I continued with my modeling tasks and finishing up all of the upgrade models and their UVs so that they can get textured. I was also tasked with putting in thematic lighting within levels 1B and 2A along with putting in the textured modular pieces in Level 2A.
Drop Chance
Unnecessary Dialysis
Movement Speed
Divine Right
Slide Speed
At the beginning of the sprint, I wanted to try and knock out all of my modeling tasks for the upgrades. These didn't take too long to do once I got an idea for what we wanted the upgrades to look like. Knocking out this tasks at the beginning of the sprint allowed me to get back to working on my tasks tied to my levels. Level 1B Lighting and Fog
Coming back to Level 1B, I had one task to implement thematic lighting within the level. This took a little time and playing around with different light sources. I eventually got to a point where I used spot lights for the ceiling in the man made sections of the level. In the mine areas of the level, I have placed some point lights which will be the areas I put the lantern models once they come in. I felt like in these mine areas they needed to be a little bit darker and ominous when compared to the man made areas which are a little more lit up.
After the lighting was completed in this level, I felt like it still wasn't as ominous or spooky as it should be so I looked into different ways of adding fog or like a haze around the mine areas. I worked with the lighting-environment tab a little bit within Unity and got an environment fog in place that actually achived the look that I was going for in this level.
Level 2B Assets
My longer task this sprint was remodeling all of level 2A with all of the modular pieces to add the detail to this factory style level. This took some time since I wanted to make sure all of the pieces were lined up correctly and did not have any showing seems in them. Once I had all of the modular floors and walls in place, I went back over all the floors and replaced some of the plain flat foors with either the grated or square floors to change up the looks of rooms or patterns in the floors for some more detail. The ceilings were the last part of this process and went pretty quick with no real issues.
I did run into some height problems when trying to replace the blockout stairs with the new modular stairs. I had to make some changes to elevations of higher rooms so that all of the pieces line up correctly which took a little bit of time. I also had to modify some some over hang areas since the floor pieces are see through on the bottom so I just used some wall pieces to cover up overhanging/ catwalk areas. I was also able to implement our breakable wall feature in this level for the the players to get to the hidden area in the middle of the map.
The last part in finishing up this level was to add in all of the thematic lighting throughout the level. Since the level is taking place in a factory, I have used only spotlights on the ceilings to give some nice light for rooms and hallways. After lighting was completed I replaced all of the blocked out enemies in the level and implemented our miner and ranger models throughout the level. I also changed all of the pickup, and lootbox blockout models with our assets for shield, health and destructible box models.
Checkpoint Locations Level 1B
Level 2A Checkpoints
The quickest tasks I was able to get done this sprint was putting in the checkpoint locations within level 1B and 2A. All I really had to do for these was to put a couple empty gameobjects at points in the level where the player had progressed far enough to be able to respawn at if they end up dying at some point. Currently level 1B has 3 checkpoints in place and level 2A has two checkpoints.
I was able to get a lot of work done this sprint and the levels are starting to look really good. Only have one more level to put modular pieces in but I am still waiting on those to be finished but I am excited to be getting closer to the finish line to see the final product of this game.
Sprint Blog 4
This sprint, I had a lot of tasks tied to finishing up the blockout of level 2A and resizing and texturing level 1B. Along with these level design tasks, I was given modeling tasks to create the models for each of the upgrades in our game.
Level 2A Items
Finishing up level 2A did not take too long since all that was needed to complete the blockout was to place item locations, preloaded enemy locations, and loot box locations. Since this level is much smaller than the following level, the rooms do not require as many enemies or items to be placed throughout the level.
Level 1B Textured
Last sprint, I encounter a problem with level 1B being way too large making playthroughs take forever. A good part of this sprint was tied to completely remaking this level and sizing it correctly to the play scale to make sure the rooms, hallways, and overall length of the level is not too long. I saved a lot of time by rebuilding the level with the textured modular pieces rather than remaking the blockout.
After the level was rebuilt and textured, I would do some playtest run throughs to make sure there were no holes in the walls or ceilings. If I did encounter any holes or seams, I would fix those right away or add some wall pieces to cover bigger holes.
Level 1B Continued
After some more models were created for levels 1A and B, I began to add them into the level to add some more detail and make the mines feel like they are mines. In some of the bigger rooms, the player can see rock columns or large boulders scattered around the rooms. I also replaced loot box blockout pieces with the new textured destrucible boxes. I made some edits to the boxes so that we would have one smaller box that can be destroyed and drop loot and I made a stack of large boxes that can be destroyed but can be used as cover for the players or jumping areas.
Within these first two levels we also have begun using our enemy models which look great and help differentiate between enemies a lot more. I also began using the new shop models to build out the shop room for level 1B which looks really good so far but just needs some some more textures to complete it.
Modeling
Towards the end of this sprint, I began working on some of the models that I have to create for each of the upgrades. So Far I have managed to complete the Scrap armor upgrade model and got the UV map completed for that and I have modeled the battery upgrade but still have to get the UVs done for that model. Modeling isn't much of my strong suit but I like how the Scrap armor turned out and am excited to see it once it is textured.
I didn't really encounter any problems this sprint except for being blocked at times because we were missing models to incorporate into the levels. So far everything is coming together really nicely and after playtesting our game at the state it is in right now, I cannot wait to see the final product.
Sprint Blog 3
During this sprint, I was tasked with implementing enemy spawners and wave spawners in levels 1 and 3 along with placing preloaded enemies and locations for pickups in level 3. Finally, I was tasked with creating a blockout and annotated map for level before the the player gets to the factory.
Levels 1 and 3 Enemy and Wave Spawners
The enemy and wave spawners allow us to have enemies get spawned into the game when the player walks through a specific collider placed in either a room or hallway. This enables me to be able to reduce the amount of preloaded enemies within the game and can allow be to set ambush spots around the levels for the players. Before placing all of the spawners within the levels, I first had to test them out and see how they worked and what I would be able to do with them.

In the boss room for level 3, there is a collider that the player will walk through when entering the room and this will trigger the first wave of enemies to be spawned into this boss fight. For this room there will be a couple waves of enemies that the player will have to defeat along with the bosses. The other waves of enemies will spawn over times as the player kills the two bosses in the room. I planned for the waves to be set this way so that the player can choose weather to go after the bosses at that time or the other enemies.
In other areas such as hallways in both levels, there are enemy spawners where they will get spawned in around the corner of a turn when the player walks through the triggered collider. This can give the players a sense of being ambushed out of nowhere and keep them on their toes throughout the levels.
Level 3b preloaded enemies and props
When it came to level 3, I had some finishing touches to make reguarding the entire blockout being completed. Most of my tasks to complete this blockout involved placing locations and items around the level. This level incorporates the use of Keycards to open locked doors so I had to place locations where the player would have to go to pickup these keycards that correspond to a specific locked door. The other items i needed to place throughout the level included: loot box locations, explosive locations, and preloaded enemies.
Level 2a Blockout and Annotated Map
My biggest task for this sprint was to create the annotated map and blockout for level 2a. The annotated map did not take much time to create but the blockout was the task that was time consuming because we wanted to use probuilder for these smaller levels. This was a little bit of a challenge because I did not really know how to use probuilder but I managed to find a lot of Youtube videos which taught me how to use the probuilder tools. Once I felt like I had an understanding of probuilder, I began building level 2a.
Level 2a is a much smaller level compared to the bigger level 2b and this level incoroporates things like power cells and generators for power. The player must explore the level to find two different power cells to put in the generator to turn on the power which will then open a locked door where they will be able to pickup a keycard to be able to open the exit door. This level was also built to be very close quarters because the player will have gotten the shotgun in the previous level and get to test out how the shotgun works within this level.
Problems/Solutions
One of my other tasks that I working on in this sprint involved putting in the modular pieces within level 1b. This was very difficult and extremely time consuming because the cave themed modular pieces were very round and didn't line up most of the time when I tried to put them together. This caused problems of there being seems in areas that show outside the map or there would be problems of hallways becoming wider than they should be. Our solution for this is to rework the pieces to be more squared and boxy so that it is easier for us as level designers to build the levels with those pieces.
Another problem that I discovered was level 1 was way too big. After the first playtest, players were getting lost within the level and felt like it was too long and this is because of a sizing issue and not properly scaling the level when building it. To solve the problem of this level being too big is to recreate the level using the modular pieces to have a proper scale for everything and to make sure the level is not too long and become boring for the players.
Sprint Blog 2
This sprint, my major focus on completing the blockouts for levels 1 and 3. Along with building the basic layouts of the levels, I was tasked with putting in asset locations of item pickups, enemies, and explosives.
The first tasks I completed in the sprint were building the blockouts of levels 1 and 3 in unity. Creating these blockouts were fairly simple but the hard part was getting the sizing correct. I had to resize level 1 a couple times due to not having a player model in for sizing purposes. Level 3's blockout took soom more time since it has rooms that overlap each other, angled pathways, rooms that arent square. With only a few changes from the original annotated maps I was able to create lengthy levels that will give players a lot to do in each level and areas to explore.
Levels 1 and 3 blockouts
My next task involved blocking out the boss rooms for each level. Each boss room has to be different since the player will be encountering a different boss for those rooms so the layouts had to be developed around those parameters. For example, in level 3 the player will encounter two heavy bots that will try and keep the player in between them so that the player has to maneuver around the room to get the two bots together or shoot at each other. Within level 3 boss room, there isn't much cover for the player but there are areas for them to get high ground like the catwalks or the center podium. In level 1's boss room, there is much more cover along with some elevated catwalks to give them high ground. Within the boss room of level 1 there is also a pitfall that the players have to be mindful of or else they can fall to their death.
Levels 1 and 3 boss rooms


The last blockout tasks that I had to do was to block out the shop rooms for each level. The shop area is going to be the place where the players can buy upgrades or items like health packs or shields with the scrap that they can get from the levels. The blockouts for these shops were pretty simple since the layout of said shops will be the same in each level with the differences being the props that will be placed in those rooms. In level 1's shop I incorporated a stack of cubes to represent the palats that will be next to the merchant and at one side of the room I have a boarded up cave to go along with the theme of the level being in the mines. In level 3, I placed desks that have monitors and keyboards on them to represent the laboratory theme.
Levels 1 and 3 shop blockouts
After completing all of the blockouts, I had to start putting in location spots for other assets that will be in our game. In level 1, I placed asset locations for health and shield pickups, drop boxs, and explosives. The other things that I placed within level 1 were all the enemies so that the player would be able to have something to fight in the first electronic prototype. Most of these enemies were static but there were a few that would patrol hallways in the level. In total there are over 100 enemies within level 1, 5 health pickups, 8 shield pickups and 40 drop box locations.
Level 1 items incorporated
Once level 1 was all prepared for the first electronic prototype, I started adding assets for level 3. So far, I have been able to get locations for all the health and shield pickups in level 3 and a few of the explosives added within the level. I still have to add drop box locations and enemy locations within the level to finish off level 3.
Level 3 items incorporated
Overall, this was a very productive sprint and getting level 1 completed for the prototype was great. We were able to playtest and search for bugs within the game really early made some changes before sending the first build. I was able to do a lot of playtesting on the enemies and how they will interact with the player and this can help me a lot when completing level 3.
Sprint Blog 1
In this first sprint, we have kicked off with a strong start. As one of our level designers for this game, I have been tasked with the conceptualization and creation of levels. I will be working on 2 levels for this game that take place in the mines (level 1) and a laboratory (level 3).
Before getting started with my tasks, I took some time watching gameplay of Ultrakill, the game that Marred's gameplay will be based off of, to get a sense of how the corridors and rooms are build and how the player moves throughout the game. I learned that the game we are going to create is going to be a fast paced shooter where the player is constantly moving around. After getting a better understanding of how our game is going to work, I did some research to find some annotated maps to gain some ideas for layouts of the levels that I will be creating.
Level 1 Mines annotated map and reference
Once I completed my research, I got started with my first rendition of the level 1 annotated map. When this first draft was completed, I consulted with our designer to see what needed to be added to the level and what is missing. After getting some feedback, I added some more corridors and other enemy wave rooms to try and lenghten the level a lot more.
Level 1 Annotated Map Complete
With the mine level is the first level in our game, it is like the introduction for players. I created a little bit of an introduction path at the begining of the level for the players to get accostumed to the controls and what they can and cannot do. After this introduction path, the player obtains their first weapon and gets thrown right into combat and the rest of the level that they must explore. Since the level takes place in the mines, I made the corriders be able to connect with one another and to multiple rooms giving the players different routes that they can take throughout the level.
Level 3 Lab annotated map and reference
The next task that I took on was creating the annotated map for level 3. This map takes place in a laboratory and brings new challenges that the player must face. This level is a little more linear and unified but still makes the player explore the entirety of the map. In this level, the testing rooms are the main areas where the players will be confronted with waves of enemies and in one they obtain the railgun to add to their arsenal of weapons. Players also have to explore this level to discover keycards that can open up sealed doors so that they may continue on through the level.
Level 1 & 3 Boss Rooms
The rest of the tasks that I had to complete for this sprint were simple and similar to one another. These tasks involved creating annotated maps for the layouts of the boss rooms and shop rooms for levels 1 & 3. Creating the boss room maps took a little time because I had to understand what boss the player the player will face in that room. For example, in the laboratory boss room, the player faces off against two heavy sentury bots that work in unison to keep the player in between them. In this level there is a lot of open area not much cover for the player so that they are forced to move around the map and try and get the sentry bots to shoot each other.
Level 1 & 3 Shop layouts
The annotated maps for the shops were very simple since the the layout for the shops are going to be the same but with different texture maps so that they can correspond to the level they are in. The differences between each shop in each level is the prop layouts and what props are going to be used in those levels.
This sprint didn't come with really any problems or difficulties at all. The only things that I have faced was having to revise maps multiple times till they were designed to the liking of our designer. Other than that, I have been on track with all my work and have gotten ahead and started working on the blockout of level 1 and getting that up and running for the first round of playtests.


Comments
Post a Comment